Image rebuilding best practices
.png)
Introduction
In the world of container security, image rebuilding is no longer optional. Even images that scan CVE-free today may accumulate new CVEs tomorrow, which is why, left unchecked, these weaknesses pile up and create a constant burden on security and engineering.
Rebuilding container images is the most time-consuming yet reliable way to address this – refreshing them with the latest patches, updating dependencies, and ensuring that the foundation your applications run on remains as secure and stable as possible.
At echo, we do this every single day. In fact, we’ve rebuilt hundreds of container images from the ground up to eliminate vulnerabilities at the source. This continuous hands-on work has given us a clear perspective on what works, what doesn’t, and how organizations can get it right at scale. So, in this ebook, we’ll share the knowledge we’ve developed through that experience – from why rebuilding is so essential, to how to approach it systematically, to lessons that can help your team save massive amounts of time, resources, and effort.
Key takeaways:
- Container images quickly accumulate CVEs, and rebuilding is the only reliable way to maintain a secure foundation.
- Testing is just as important as rebuilding, from upstream parity checks to real-world orchestration scenarios.
- Scaling testing to complex environments ensures images work where they’ll actually be used, not just in isolation.
- Rebuilding is a complex, time-consuming, and ongoing project, which is why handing over the burden to experts can effectively accelerate security.
The principles of secure image building
Rebuilding container images isn’t just about patching what’s broken; it’s about applying a set of principles that ensure your images are actually secure. These principles are meant to guide how teams choose an operating system, manage dependencies, and enforce compliance. And, when followed consistently, they dramatically reduce vulnerability exposure while maintaining image stability and functionality.
So, let’s unpack what’s actually needed:
A secure base operating system
Security starts at the base. If the operating system the image is built upon is full of CVEs, no amount of patching at higher layers will keep it fully safe. That’s why so many teams adopt lightweight options like Alpine Linux or Distroless, which naturally have much smaller attack surfaces. In fact, distroless images strip away everything except what’s strictly needed to run an application, minimizing the number of potential vulnerabilities altogether.
That said, choosing the most minimal OS can directly impact how images function. Tools or libraries, for example, may not behave the same way across distributions, so it’s important to weigh these trade-offs and test thoroughly. Regardless of the base you choose, staying current with the latest OS releases is critical, since vendors regularly publish updates and patches.
Minimal dependencies and layers
Every extra dependency increases your attack surface, which inherently increases the risk of vulnerabilities. That’s why it’s so important to only install what is actually essential and get rid of unnecessary packages. Multi-stage builds are the most strategic way to do this, allowing you to remove build-time artifacts and keep the final runtime image clean.
It’s also equally important to ensure your installed packages stay updated. Even brief update delays can expose your environment to known exploits, especially for widely used libraries, so applying the latest security patches from maintainers as soon as they’re available is key.
Effective compliance and regulatory standards
Finally, recognize that security isn’t just about reducing vulnerabilities – it’s also about maintaining trust and meeting organizational requirements. Try to run upstream tests to confirm functionality hasn’t been broken during rebuilds to ensure images are aligned with upstream standards and remain compatible with their ecosystem.
Compliance frameworks such as STIG or CIS Benchmarks may be mandatory in regulated environments, so adhering to them early avoids massive amounts of rework later on. Security best practices like image signing and generating a Software Bill of Materials (SBOM) provide transparency and assurance, making it easier for teams and auditors to trust that the image is verifiably secure.

How rebuilding actually works
Honestly, rebuilding a container image is a pretty complex process. It’s not just about replacing packages or recreating the environment – it requires carefully balancing security, minimalism, and compatibility. Every choice you make, from the base image to user permissions, affects the final outcome. Let’s break it down step by step.
.png)
First, rebuilding starts with choosing the smallest viable, secure, and hardened base that still satisfies runtime needs. For example, if your image performs network operations, you’ll need OpenSSL and netbase; if it needs to build software, you’ll likely require binutils or GCC. It’s important to strip away any non-essential OS packages, such as package managers, shells, and development libraries.
Pro tip? If you’re building with Dockerfiles, using fewer steps typically reduces the final image size. It’s common practice to lump commands into a single `RU step (balance this with cacheability during frequent builds).
Next, install your application’s required runtime framework (if needed), such as Node.js, .NET, or Java on top of your base ,making sure to match the version your app depends on. Then add any other packages your application requires.
After that, it’s time to install your application. Build it in an isolated environment or in a different stage to eliminate build dependencies and artifacts. Strip away debug symbols, docs, and tests that aren’t essential for runtime.
Pro tip: Remember to verify checksums and signatures when downloading packages or software.
Finally, validate that the rebuilt image complies with the original upstream image. Ensure all properties are configured and all binaries are installed in their original locations, create required users and groups, and align file permissions. Don’t forget to ensure drop-in compatibility, especially for images that are part of a larger system, like with Helm charts. To do this, add all necessary environment variables, expose required ports, and provide a compatible entrypoint.
Hardening steps:
Most images won’t pass standard hardening benchmarks out of the box. For example, many default to running as the root user because no USER is configured. To harden the image, set a non-root user, make the root filesystem read-only while allowing writes only to necessary paths, and enforce restrictive networking permissions.
Tackling the CVE problem
Rebuilding gives you a secure baseline, but the work doesn’t end there. CVEs are constantly being discovered, and without an intentional process, even the cleanest image will quickly become vulnerable again. That’s why truly tackling CVEs means treating security as an ongoing practice, rather than a one-off issue.
The process starts with cleaning the initial image. Run a baseline vulnerability scan to establish a clear picture of its status. Some images are minimal and may only contain a handful of CVEs. Others, especially those with many packages, can include hundreds or even thousands of vulnerabilities.
Based on your scan result, start upgrading or removing vulnerable packages according to their functionality importance. In many cases, no pre-built fixed version will be available for download, which means you’ll need to apply a patch manually. Sometimes that patch comes from the vendor; in other cases, you may need to create and apply a custom patch yourself to close the gap. Repeat cleaning, patching, and rebuilding until scans show a CVE-free image.
Pro tip: Maintain several clean base images, each with its purpose (e.g., a compile base,a base with OpenSSL) that you can reuse across several images to save time and effort.
But how can you keep the image clean over time?
- Continuously scan for vulnerabilities throughout all key stages of the pipeline.
- Patch or upgrade affected packages.
- Upgrade frameworks and app dependencies to their latest patch versions.
- Monitor upstream releases and advisories.
- Track end-of-life (EOL) dates so you can prepare for when it stops receiving security updates and inevitably accumulates CVEs.
- Integrate automated image rebuilding and patching into your pipeline.
- Address CVEs within your company’s SLA for security patches, since time-to-fix is a measurable security objective.
- Even if no new CVEs have appeared, schedule periodic rebuilds to validate that your pipeline can still produce a clean image end-to-end and prove that your images aren’t stale to your users.
Testing for compatibility
Building secure container images is only half the battle – ensuring they actually work as intended is just as critical. Without proper testing, even the most carefully rebuilt image can introduce regressions, break dependencies, or drift so far from its upstream source that it breaks applications altogether.
The importance of testing images
Testing provides confidence that hardened images can still function as drop-in replacements.
- Validating parity with upstream images helps confirm that changes made during rebuilding haven’t changed expected behaviors. This is especially important when switching to leaner bases like distroless, where missing utilities or libraries can trigger functionality failures.
- Testing for compatibility also helps catch regressions or bugs introduced during security hardening or dependency pruning. For example, removing a seemingly unused package might break a tool or image down the chain, so testing early helps teams avoid surprises later.
- Measuring performance and size ensures images don’t bloat over time or lose efficiency due to added security controls. Creating baselines for image size, startup time, and runtime performance can make it easier to spot and prevent degradation before it becomes an issue.
- Running images in real-world conditions ensures they behave as expected in production environments. Testing in orchestration platforms like Kubernetes helps confirm networking, logging, and monitoring integrations work correctly, and that the image scales properly under load.
How teams typically do this
Most teams extend their existing CI/CD pipelines to support image compatibility testing.
This typically starts with sanity functional tests, which validate the images in a representative scenario. And to ensure full image security and functionality, the following tests are also essential:
- Upstream unit and integration tests to confirm the rebuilt image supports core functionality and application workflows.
- Regression tests to guarantee that fixes and features aren’t undone by changes introduced during hardening or minimization.
- Performance benchmarks to measure startup time, runtime efficiency, and resource usage against established baselines.
- Staging deployments to validate networking, logging, monitoring, and scaling behavior in orchestration environments like Kubernetes before pushing to production.
Mature teams also fold in security and compliance checks, which include verifying SBOM accuracy, scanning for misconfigurations, and confirming alignment with standards like CIS or STIG. In some cases, chaos or resilience testing is layered on top to see how images perform under stress or failure scenarios.
The goal of this testing is to replicate real-world conditions, minimize surprises in production, and ensure that rebuilt images remain trustworthy and operationally sound.
How we test our images
While many teams extend their pipelines to cover compatibility, at echo, we take testing several steps further. Because we build and maintain CVE-free images at scale, our testing process ensures every image we release is not only hardened but is also a seamless, drop-in replacement for its upstream equivalent.
Our testing happens in multiple layers:
- Package-level validation: All echo package must pass tests on every new build, including smoke tests and functional tests to ensure components behave correctly in isolation before they are ever included in an image.
- Dedicated compatibility pipeline: Once an image is built, it enters a rigorous pipeline that validates compatibility at every stage and ensures it’s ready to be shipped to our customers:
- Interface checks: First, we verify that the image’s interfaces match the upstream version of the image, including entrypoints, exposed ports, and environment variables, so they can be seamlessly swapped in.
- Performance and sizing tests: Next, images are benchmarked against upstream performance and size to confirm there’s no degradation. echo images are typically slimmer than their counterparts, with equal performance.
- Upstream test execution: At this point, for fundamental images like python and node, we also run the official integration tests provided by the upstream project. These are the same tests used to validate their own new releases, making them the most reliable.
- Environment-specific functional tests: We’ll also recreate real deployment scenarios to confirm behavior. For instance, if an image is normally deployed via a Helm chart, our tests install it the same way to validate functionality in context.
- Compliance and security validation: Finally, we test our images against required security standards. Depending on the use case, this may include OSCap-driven STIG validation or custom in-house FIPS tests.
Scaling to the most complex environments
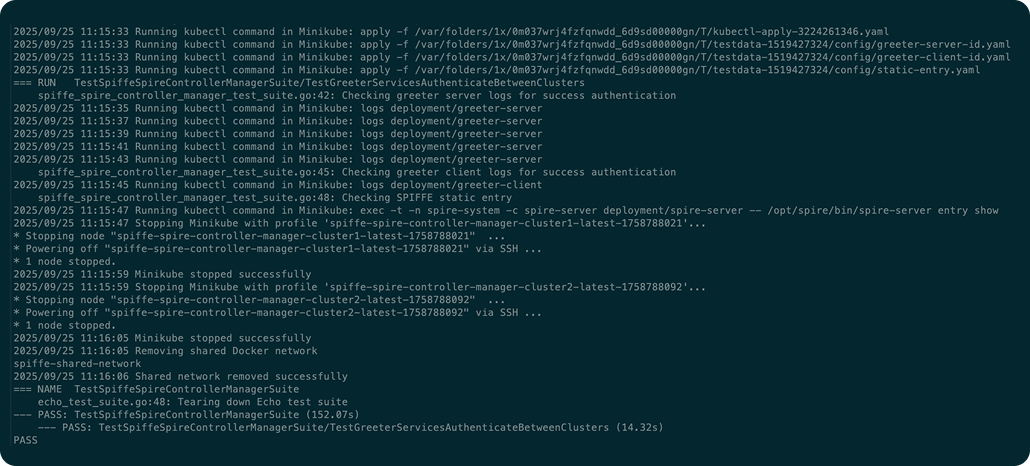
Container images are often just one part of a more complex system, typically deployed to Kubernetes via Helm charts. For these images in particular, it’s critical to validate that they are drop-in compatible with their upstream counterparts, since they will be consumed within the original charts. Testing in these cases isn’t as simple as just using `docker run . Instead, a complete Kubernetes environment must be set up.
Our automated tests provision a cluster, deploy the application to it, and run end-to-end validations. The Helm chart is pulled and updated to include our custom components. Some tests focus on a single custom component, while others deploy multiple custom images within the same test to ensure they integrate properly.
For certain images, an even more complex environment is required. For example, some workloads require interaction with an AWS stack to perform operations, while others depend on GitOps workflows that must connect to remote repositories. In these cases, simulating a representative environment is essential. Without it, compatibility issues or integration failures could go undetected until production.
By scaling testing to these complex environments, we ensure that echo images don’t just work in isolation, but in the same demanding contexts where customers actually need to use them.
Example rebuilding workflow
- Start from a hardened base image: In this example, we’ll use echo’s dynamic image as a base, since the Java image doesn’t require more than a clean, hardened Linux foundation. Creating this base from scratch is a complex process in itself, involving careful rebuilding of core system packages to remove vulnerabilities while maintaining compatibility. This sets the groundwork that makes secure rebuilding possible.
- Build the Java Development Kit (JDK): Next, we need to build the JDK in order to install it on our image. In this example, we’ll use the latest version of the Eclipse. If any CVEs are present in the JDK release, we must patch them at this stage before installation. This step should be performed separately or in a different build stage to ensure no build artifacts are carried into the final image – while making sure installation happens in the same paths as the upstream image.
- Install required dependencies: The following step is to install our package on the clean base alongside all its dependencies. In the case of the JDK, it requires a bunch of low-level system libraries, including libc6, libxrender1, and zlib1g. If any of these packages contain vulnerabilities, they must be rebuilt from source. For example, libc6 in Debian 13 has seven open CVEs, which must be addressed before inclusion.
- Test custom packages: We then test all of our custom packages using unit tests and automated functionality tests. JDK is also validated with smoke tests to confirm all exported binaries function correctly.
- Finalize the image: After installing the JDK as well as all of the required clean JDK dependencies, we export the necessary environment variables and entrypoint into the Dockerfile to maintain compatibility with the upstream image.
- Run upstream test suites: At this point, we’re ready to begin testing our image. Because Java is a foundational image (with many others building on top of it), we run the upstream tests from Adoptium (the Temurin software distributor.) The tests are cloned from the official Adoptium repository and run using jtreg. Running these comprehensive tests provides confidence that the rebuilt image is fully compatible and working.
- Execute echo-specific tests: In addition to upstream tests, we also run our own tests – in this case written for the JDK image – to ensure it works as intended under common sanity flows. For example, compiling and running Java code, producing JAR files, and running common Java frameworks.
- Verify compliance: At this point, with functionality confirmed, we check compliance against required standards. In this case, while we’re not building a FIPS image, it still must comply with STIG standards, which we validate using OpenSCAP (Open Source Security Compliance Solution). This tool, together with our customized SCAP file – a set of checks for STIG requirements – scans the Java image and verifies that all STIG checks pass.
- Perform a final CVE check: As the final step, we scan the image to confirm that no remaining packages contain unresolved vulnerabilities. Once cleared, the image is considered production-ready.

Best practices & key takeaways
Rebuilding container images isn’t a one-time task. It’s an ongoing discipline that requires deep expertise, constant vigilance, and effective workflows and infrastructure. Every step, from selecting a hardened base to validating drop-in compatibility in Kubernetes, comes with trade-offs and hidden complexity. Doing it right means not just cleaning up the CVEs that exist in your images today, but ensuring they remain secure, functional, and compliant over time.
To be frank, most teams don’t have the time or resources to maintain this process themselves. Developers want to build features, not rebuild base images, and security teams are already stretched thin chasing vulnerabilities across the app. And yet, unpatched CVEs need to be handled because they leave you exposed to serious risk, stall critical compliance audits, and erode trust in production environments.
That’s why many teams are increasingly turning to solutions like echo to hand off the heavy lifting of image rebuilding. At echo, we rebuild images at scale every single day, removing vulnerabilities at the source, validating compatibility with upstream projects, and ensuring compliance with the strictest enterprise standards. With CVE-free container base images, your teams can focus on what really matters, knowing that your foundation is always secure and production-ready.
Want to learn more? Let’s chat.
Request a demo
.avif)